Why Installing Flower Bed Edging Makes a Real Difference in Your Yard
To install flower bed edging, follow these basic steps:
- Mark your border with a garden hose or spray paint
- Dig a trench 3–4 inches deep along the marked line
- Add a base layer of sand or gravel if using stone or pavers
- Place your edging material and secure it with stakes or backfilled soil
- Water lightly and compact the soil to settle everything in place
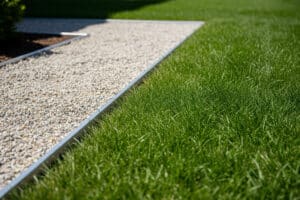
A messy border between your lawn and flower beds can make even a well-maintained yard look unkempt. Install flower bed edging correctly, and the difference is immediate — clean lines, contained mulch, fewer weeds creeping in, and a lawn that’s much easier to mow.
Edging does more than look good. It creates a physical barrier that keeps grass from spreading into your beds. It holds mulch in place. And it gives your mower wheels a clear path to follow, so trimming along the edge takes far less effort.
Whether you’re using plastic strips, natural stone, metal, or pavers, the process follows a similar set of steps — and it’s very manageable as a DIY weekend project.
I’m Tyler Wilson, owner of Copperhead Lawn Care, and I’ve helped homeowners across the Lutz and Tampa Bay area install flower bed edging that holds up through Florida’s heat, rain, and year-round growing season. In this guide, I’ll walk you through exactly how to do it right the first time.

Choosing the Right Materials to Install Flower Bed Edging
Before you grab your shovel, you need to decide which material fits your home’s style and your maintenance goals. In areas like Wesley Chapel and Land o’ Lakes, we see a wide variety of styles, from modern minimalist to lush, tropical Landscape Transformation.
| Material | Durability | Flexibility | Best For |
|---|---|---|---|
| Plastic/Rubber | Moderate | High | Curved beds, budget-friendly projects |
| Metal (Steel/Alum) | High | Moderate | Clean, nearly invisible modern lines |
| Natural Stone | Very High | Low | Rustic, high-end, permanent borders |
| Brick Pavers | High | Moderate | Formal looks, mowing strips |
| Composite | High | High | Eco-friendly, rot-resistant curves |
Plastic and Rubber Edging This is the most economical choice. It’s incredibly flexible, making it the go-to for circular beds around palm trees or winding paths. However, it can be prone to “frost heave” (though less of an issue in our Florida climate) and can sometimes be nicked by heavy-duty weed whackers if not installed deep enough.
Metal Edging Steel and aluminum are the pros’ secrets for a “barely there” look. It’s very durable and creates a crisp, professional line that stays put. It’s excellent for separating grass from a Mulching Rocking project.
Natural Stone and Brick Pavers If you want a timeless look, stone is the way to go. Whether you use slate shards, fieldstone boulders, or uniform brick pavers, these materials add architectural weight to your yard. They are the most durable long-term investment, often lasting 25 to 50 years.
Essential Tools and Preparation for Your Project
Having the right tools makes the difference between a project that takes two hours and one that takes all weekend.

- Spade vs. Shovel: For edging, a spade is your best friend. While a round-point shovel is great for scooping dirt, a spade has a flat, rectangular blade that allows you to cut straight, clean vertical lines.
- Half-Moon Edger: This tool is specifically designed for slicing through turf. It gives you incredible control over curves.
- Marking Tools: A garden hose is perfect for “drawing” curves on the ground, while white marking paint or a string line works best for straight runs.
- Rubber Mallet: Essential for tapping pavers into place or driving stakes without damaging the edging material.
- Safety Gear: Don’t forget work gloves and eye protection, especially if you’re cutting metal or stone.
Before you dig, we always recommend a quick Property Clean Up to remove large debris or overgrown weeds that might obscure your lines.
Planning Your Layout to Install Flower Bed Edging
Start by laying out your garden hose or rope to visualize the shape. Once you’re happy with the flow, trace the line with spray paint.
Pro Tip: When measuring the length of your border, always buy 10% more material than you think you need. This “waste factor” accounts for cuts, overlaps, and the occasional mistake. If you’re deciding between a new bed or revitalizing an old one, consider our Sod Vs Seed Which Lawn Installation Option Is Right For You guide to ensure your lawn and beds complement each other perfectly.
Also, remember to call 811 before you dig deep. Even in residential areas like Northdale or Cheval, utility lines can be surprisingly shallow.
Preparing the Ground and Soil
For a professional finish, you need to clear the way. Remove the existing turf along your marked line. In Florida, our soil can vary from sandy to thick clay. If you have heavy clay soil, we recommend doing a “ribbon test” (squeezing a bit of moist soil to see if it holds a shape); if it’s too hard, wait for a light rain to soften the ground before you install flower bed edging.
If you are replacing a large section of grass with a new bed, you might need professional Sod Laying to patch up the areas where the old turf was removed.
Step-by-Step Guide to Installing Different Edging Types
The secret to a “pro” look isn’t just the material—it’s the trench.
Most DIYers make the mistake of not digging deep enough. You want a trench that is 3–4 inches deep with a clean, vertical wall on the lawn side. This vertical wall supports the edging and prevents grass roots from “diving” under the barrier. For a natural “trench edge,” some pros use a 45-degree angle cut facing the lawn, creating a V-shape that makes the mulch appear to float.
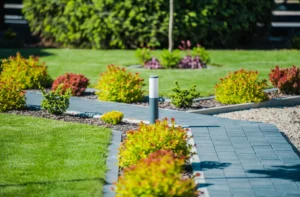
How to Install Flower Bed Edging with Pavers or Stone
Stone and pavers require a stable foundation to prevent them from sinking over time.
- Dig the Trench: Dig roughly 2 inches deeper than the height of your stone.
- Add a Base: Pour a 1-inch layer of leveling sand or crushed gravel into the bottom. This provides drainage and a flat surface.
- Set the Stones: Place your stones or pavers snugly against each other.
- Level and Tap: Use a level to check the stones front-to-back and side-to-side. Use a rubber mallet to tap high spots down.
- Fill the Gaps: For pavers, sweep polymeric sand into the joints and mist with water to lock them together. This prevents weeds from growing between the stones.
A solid stone border is a great way to transition between different areas, such as a Sod Vs Seed Guide For A Greener Yard transition zone.
Installing Plastic and Metal Strip Edging
These are much faster to install but require specific techniques to stay put.
- Warm it Up: If you’re using plastic edging, let it sit in the Florida sun for 30 minutes. This makes it much more pliable and easier to unroll.
- The Overlap Method: When joining two pieces, overlap them by about 3 inches or use the provided couplers.
- Staking at Angles: Drive your anchoring stakes at a slight 45-degree angle toward the flower bed. This “hooks” the edging into the soil, making it much harder for the ground to push it up over time.
- Height Check: The top bead of the edging should sit no more than 1/2 inch above the ground. This is high enough to stop grass but low enough to avoid the mower blades.
Pro Tips for Curves, Corners, and Long-Term Maintenance
Creating graceful curves is an art. If you’re working around a large oak tree in Odessa or a fountain in South Tampa, use extra stakes on the curves. The tension in the material will want to straighten it out; extra anchoring ensures the curve stays smooth.
Maintenance Tips:
- Backfilling: Once the edging is in, pack the soil tightly against both sides. Stomp it down with your boots to ensure there are no air pockets.
- Annual Check-up: In the spring, walk your borders. If any stones have sunk or plastic has popped up, use your mallet to reset them.
- Trimming: Even with edging, grass will eventually try to lean over the top. Use a string trimmer or hand shears once a week to keep that vertical line sharp.
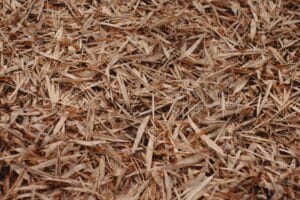
- Mulch Management: Keep your mulch about an inch below the top of the edging. If you overfill it, the mulch will just wash over into your lawn during the next Florida thunderstorm.
Properly maintained edging is a key part of any Landscape Transformation.
Frequently Asked Questions about Flower Bed Edging
How deep should the trench be for flower bed edging?
For most materials like plastic or metal, 3–4 inches is the sweet spot. This allows the edging to sit deep enough to act as a root barrier while leaving just enough visible to define the bed. If you’re dealing with aggressive grass types like St. Augustine, a 6-inch deep trench is sometimes recommended to truly stop the runners.
What is the best time of year to install edging?
Late spring or early summer is ideal. In our service areas like Lutz and Wesley Chapel, the ground is usually moist enough to work with, but not as baked-hard as it gets in the peak of August. Avoid installing when the ground is exceptionally dry, as you’ll struggle to get a clean cut in the turf.
How does edging make mowing and yard maintenance easier?
When you install flower bed edging, you create a “mowing strip.” If you use flat pavers, you can actually run your mower’s wheel right over the stone, meaning you won’t have to come back later with a string trimmer. It also keeps your Property Clean Up efforts to a minimum by preventing mulch from scattering across the grass every time you mow.
Conclusion
Installing flower bed edging is one of the most effective ways to boost your home’s curb appeal and simplify your weekend chores. Whether you choose the rustic charm of natural stone or the sleek lines of metal, the key is in the preparation and the “pro” techniques like deep trenching and proper staking.
At Copperhead Property Maintenance, we know that a great yard is all about the details. From Lutz to Wesley Chapel and across the Tampa Bay area, we take pride in helping our neighbors achieve professional landscaping results. If you’re ready to take your yard to the next level but don’t have the time to tackle the digging yourself, we’re here to help.
Transform your yard with professional mulching and rocking and let us handle the heavy lifting so you can simply enjoy the view.